Install Pipelines-as-Code in Spinnaker (Halyard)
Installation overview
Installing Pipelines-as-Code consists of these steps:
- Configure Kubernetes permissions.
- Configure the Pipelines-as-Code service.
- Deploy the Pipelines-as-Code service in the same Kubernetes cluster as Spinnaker.
- Install the plugin into Spinnaker.
Compatibility
| Spinnaker Version | Pipelines-as-Code Service Version | Pipelines-as-Code Plugin Version |
|---|---|---|
| 1.30.x | 2.30 | 0.0.5 |
| 1.28.x | 2.28 | 0.0.5 |
| 1.27.x | 2.27 | 0.0.5 |
| 1.26.x | 2.26 | 0.0.5 |
Before you begin
- You are running open source Spinnaker.
- You manage your instance using Halyard. If you are using the Spinnaker Operator, see Install Pipelines-as-Code in Spinnaker (Spinnaker Operator)
- You have permissions to create ServiceAccount, ClusterRole, and ClusterRoleBinding objects in your cluster.
Warning
The examples in this guide are for a vanilla Spinnaker installation. You may need to adjust them for your environment.Configure Kubernetes permissions
The following manifest creates a ServiceAccount, ClusterRole, and ClusterRoleBinding. Apply the manifest in your spinnaker namespace.
apiVersion: v1
kind: ServiceAccount
metadata:
  name: dinghy-sa
  namespace: spinnaker
---
apiVersion: rbac.authorization.k8s.io/v1
kind: ClusterRole
metadata:
  name: dinghy-cluster-role
rules:
- apiGroups:
  - extensions
  resources:
  - ingresses
  - ingresses/status
  verbs:
  - get
  - list
  - watch
  - create
  - update
  - patch
  - delete
- apiGroups:
  - networking.k8s.io
  resources:
  - ingresses
  - ingresses/status
  verbs:
  - get
  - list
  - watch
  - create
  - update
  - patch
  - delete
- apiGroups:
  - ""
  resources:
  - pods
  - endpoints
  verbs:
  - get
  - list
  - watch
  - create
  - update
  - patch
  - delete
- apiGroups:
  - ""
  resources:
  - services
  - services/finalizers
  - events
  - configmaps
  - secrets
  - namespaces
  - jobs
  verbs:
  - create
  - get
  - list
  - update
  - watch
  - patch
  - delete
- apiGroups:
  - batch
  resources:
  - jobs
  verbs:
  - create
  - get
  - list
  - update
  - watch
  - patch
- apiGroups:
  - apps
  - extensions
  resources:
  - deployments
  - deployments/finalizers
  - deployments/scale
  - daemonsets
  - replicasets
  - statefulsets
  verbs:
  - create
  - get
  - list
  - update
  - watch
  - patch
  - delete
- apiGroups:
  - monitoring.coreos.com
  resources:
  - servicemonitors
  verbs:
  - get
  - create
- apiGroups:
  - spinnaker.armory.io
  resources:
  - '*'
  - spinnakerservices
  verbs:
  - create
  - get
  - list
  - update
  - watch
  - patch
- apiGroups:
  - admissionregistration.k8s.io
  resources:
  - validatingwebhookconfigurations
  verbs:
  - '*'
---
apiVersion: rbac.authorization.k8s.io/v1
kind: ClusterRoleBinding
metadata:
  name: dinghy-cluster-role-binding
roleRef:
  apiGroup: rbac.authorization.k8s.io
  kind: ClusterRole
  name: dinghy-cluster-role
subjects:
- kind: ServiceAccount
  name: dinghy-sa
  namespace: spinnaker
Configure the service
Create a ConfigMap to contain your Dinghy service configuration. Be sure to check the spinnaker.yml entry in the data section to ensure the values match your Spinnaker installation.
apiVersion: v1
kind: ConfigMap
metadata:
  name: spin-dinghy-config
  namespace: spinnaker
data:
  dinghy.yml: |
    autoLockPipelines: false
    dinghyFilename: dinghyfile
    dinghyIgnoreRegexp2Enabled: false
    echo:
      baseURL: ${services.echo.baseUrl}
      enabled: true
    fiat:
      baseUrl: ${services.fiat.baseUrl}
      enabled: ${services.fiat.enabled}
    front50:
      baseUrl: ${services.front50.baseUrl}
      enabled: ${services.front50.enabled}
    orca:
      baseUrl: ${services.orca.baseUrl}
      enabled: ${services.orca.enabled}
    redis:
      baseUrl: ${services.redis.baseUrl}
    repositoryRawdataProcessing: false
    spectator:
      applicationName: ${spring.application.name}
      webEndpoint:
        enabled: false
    spinnaker:
      extensibility:
        plugins: {}
        plugins-root-path: /opt/dinghy/plugins
        repositories: {}
        strict-plugin-loading: false
    githubEndpoint: https://api.github.com
    githubToken: CHANGEME
    templateOrg: CHANGEME
    templateRepo: CHANGEME
  spinnaker.yml: |
    global.spinnaker.timezone: America/Los_Angeles
    services:
      clouddriver:
        baseUrl: http://spin-clouddriver:7002
        enabled: true
        host: 0.0.0.0
        port: 7002
      clouddriverCaching:
        baseUrl: http://spin-clouddriver-caching:7002
        enabled: false
        host: 0.0.0.0
        port: 7002
      clouddriverRo:
        baseUrl: http://spin-clouddriver-ro:7002
        enabled: false
        host: 0.0.0.0
        port: 7002
      clouddriverRoDeck:
        baseUrl: http://spin-clouddriver-ro-deck:7002
        enabled: false
        host: 0.0.0.0
        port: 7002
      clouddriverRw:
        baseUrl: http://spin-clouddriver-rw:7002
        enabled: false
        host: 0.0.0.0
        port: 7002
      deck:
        baseUrl: http://localhost:9000
        enabled: true
        host: 0.0.0.0
        port: 9000
      dinghy:
        baseUrl: http://spin-dinghy:8081
        enabled: true
        host: 0.0.0.0
        port: 8081
      echo:
        baseUrl: http://spin-echo:8089
        enabled: true
        host: 0.0.0.0
        port: 8089
      echoScheduler:
        baseUrl: http://spin-echo-scheduler:8089
        enabled: false
        host: 0.0.0.0
        port: 8089
      echoWorker:
        baseUrl: http://spin-echo-worker:8089
        enabled: false
        host: 0.0.0.0
        port: 8089
      fiat:
        baseUrl: http://spin-fiat:7003
        enabled: false
        host: 0.0.0.0
        port: 7003
      front50:
        baseUrl: http://spin-front50:8080
        enabled: true
        host: 0.0.0.0
        port: 8080
      gate:
        baseUrl: http://localhost:8084
        enabled: true
        host: 0.0.0.0
        port: 8084
      igor:
        baseUrl: http://spin-igor:8088
        enabled: false
        host: 0.0.0.0
        port: 8088
      kayenta:
        baseUrl: http://spin-kayenta:8090
        enabled: false
        host: 0.0.0.0
        port: 8090
      monitoringDaemon:
        baseUrl: http://spin-monitoring-daemon:8008
        enabled: false
        host: 0.0.0.0
        port: 8008
      orca:
        baseUrl: http://spin-orca:8083
        enabled: true
        host: 0.0.0.0
        port: 8083
      redis:
        baseUrl: redis://spin-redis:6379
        enabled: true
        host: 0.0.0.0
        port: 6379
      rosco:
        baseUrl: http://spin-rosco:8087
        enabled: true
        host: 0.0.0.0
        port: 8087
      terraformer:
        baseUrl: http://spin-terraformer:7088
        enabled: false
        host: 0.0.0.0
        port: 7088
Configure your repo
Before configuring your repos, ensure you have the following:
- A personal access token that has read access to the repo where you store your
dinghyfileand the repo where you storemodulefiles. You should create a Kubernetes Secret for your personal access token so you don’t store the token in plain text in your config file. - The organization where the app repos and templates reside; for example, if your repo is
armory-io/dinghy-templates, yourtemplate-orgisarmory-io. - The name of the repo containing your modules; for example, if your repo is
armory-io/dinghy-templates, yourtemplate-repoisdinghy-templates.
Add the following to your dinghy.yml config:
templateOrg: <repo-org>
templateRepo: <dinghy-templates-repo>
githubToken: <abc>
githubEndpoint: <https://api.github.com>
All fields are required.
templateOrg: VCS organization or namespace where application and template repositories are locatedtemplateRepo: VCS repository where module templates are locatedgithubToken: GitHub token; This field supports “encrypted” field references; see Secrets for details.githubEndpoint: (Default:https://api.github.com) GitHub API endpoint. Useful if you’re using GitHub Enterprise.
GitHub webhooks
Set up webhooks at the organization level for push events. You can do this by going to https://github.com/organizations/<your_org_here>/settings/hooks.
Set
content-typetoapplication/json.Set the
Payload URLto your Gate URL. Depending on whether you configured Gate to use its own DNS name or a path on the same DNS name as Deck, the URL follows one of the following formats:https://<your-gate-url>/webhooks/git/githubif you have a separate DNS name or port for Gatehttps://<your-spinnaker-url>/api/v1/webhooks/git/githubif you’re using a different path for Gate
If your Gate endpoint is protected by a firewall, you need to configure your firewall to allow inbound webhooks from GitHub’s IP addresses. You can find the IPs in this API response. Read more about GitHub’s IP addresses.
You can configure webhooks on multiple GitHub organizations or repositories to send events to Dinghy. Only a single repository from one organization can be the shared template repository in Dinghy. However, Dinghy can process pipelines from multiple GitHub organizations. You want to ensure the GitHub token configured for Dinghy has permission for all the organizations involved.
Pull request validations
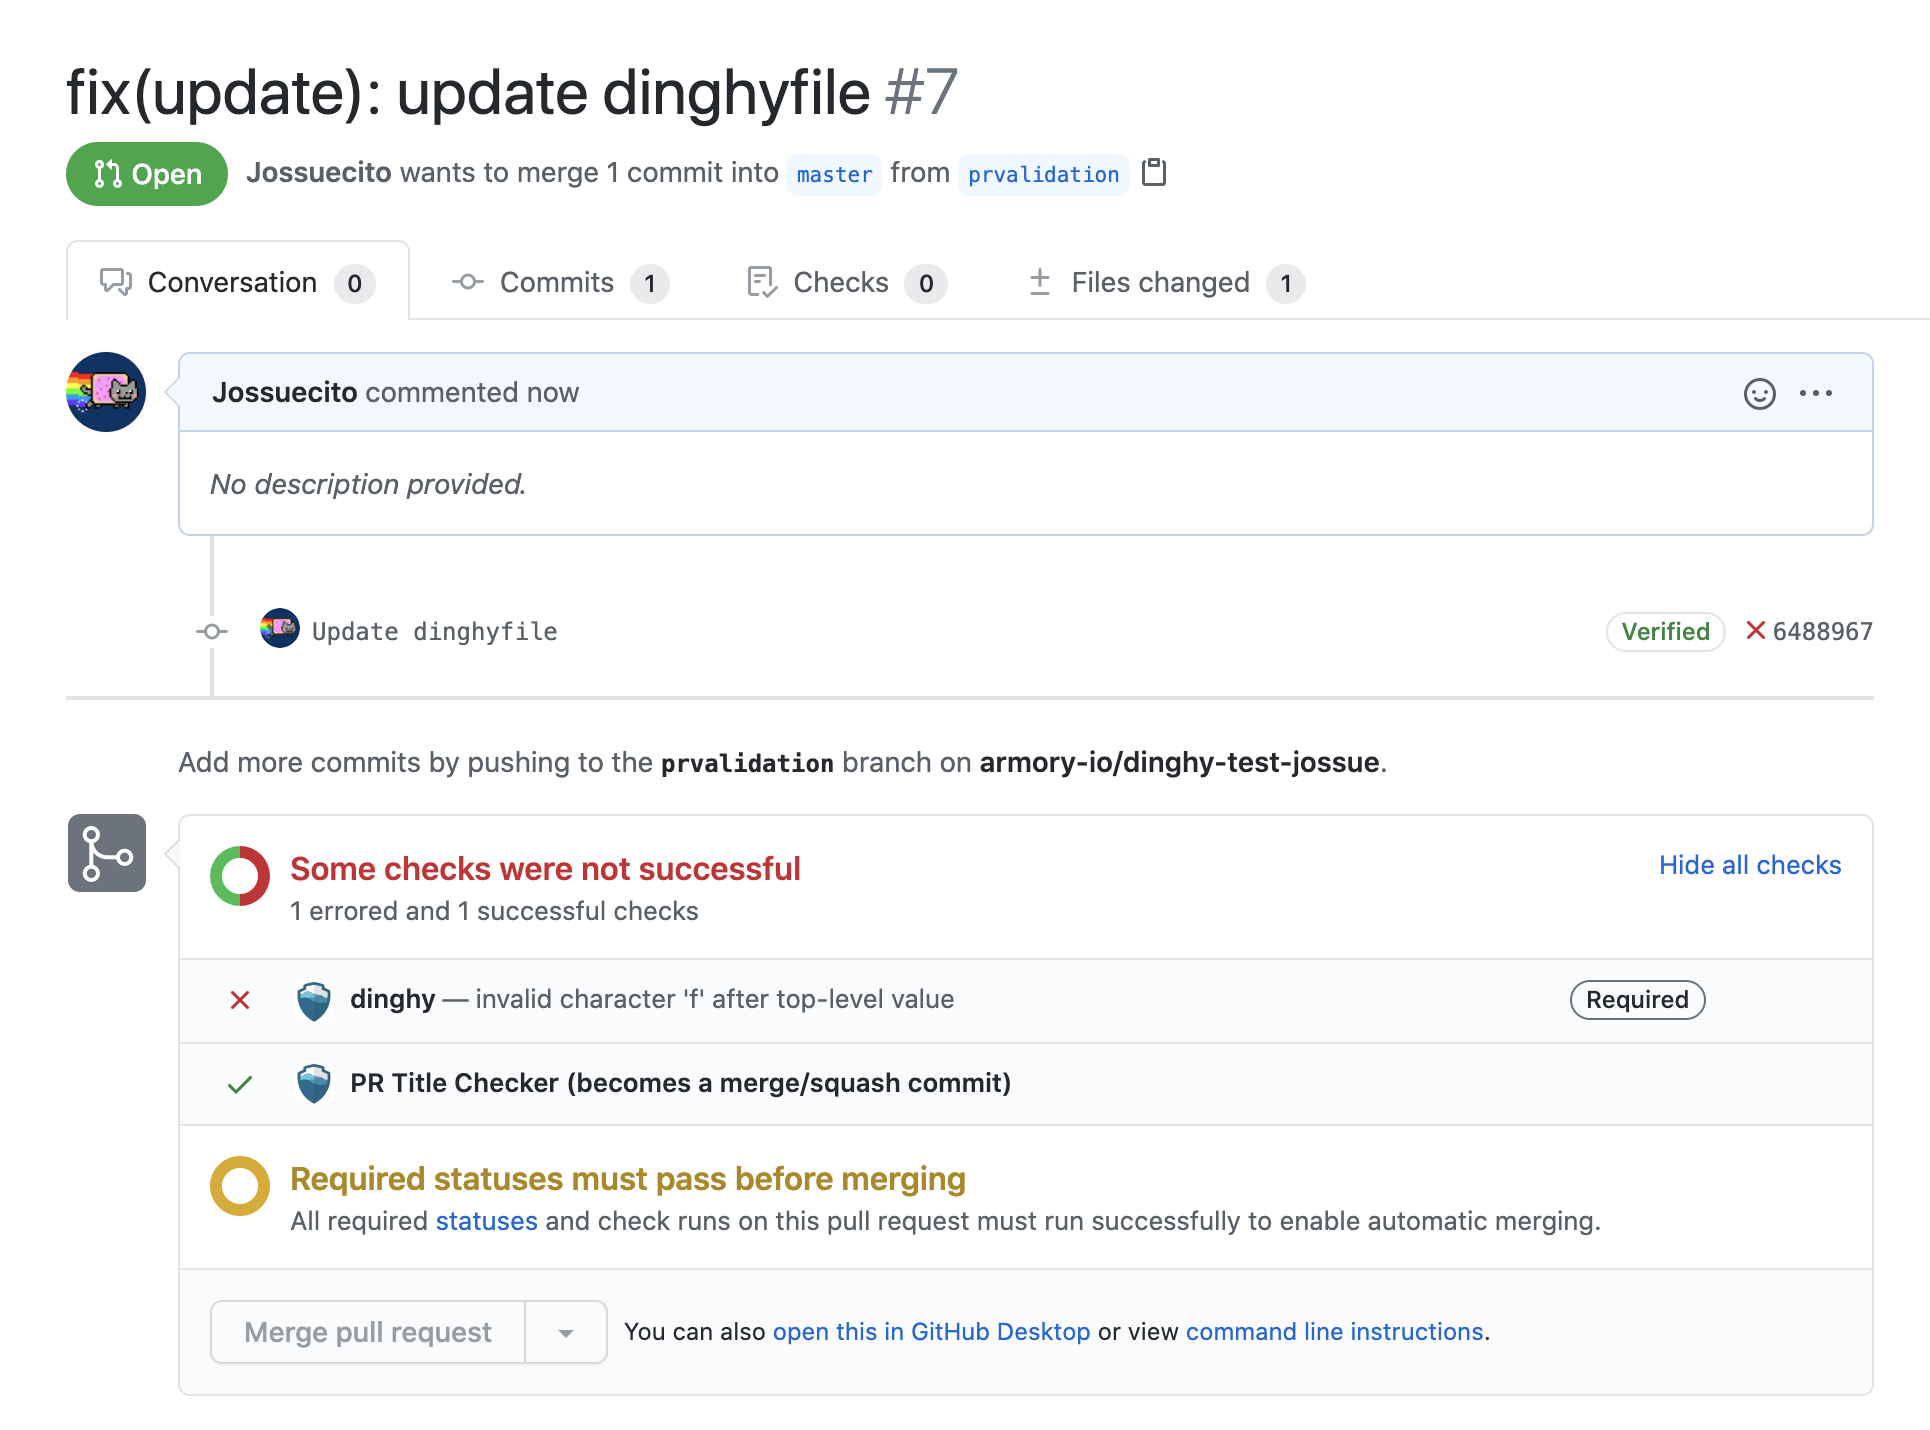
When you make a GitHub pull request (PR) and there is a change in a dinghyfile, Pipelines-as-Code automatically performs a validation for that dinghyfile. It also updates the GitHub status accordingly. If the validation fails, you see an unsuccessful dinghy check.

Make PR validations mandatory to ensure users only merge working dinghyfiles.
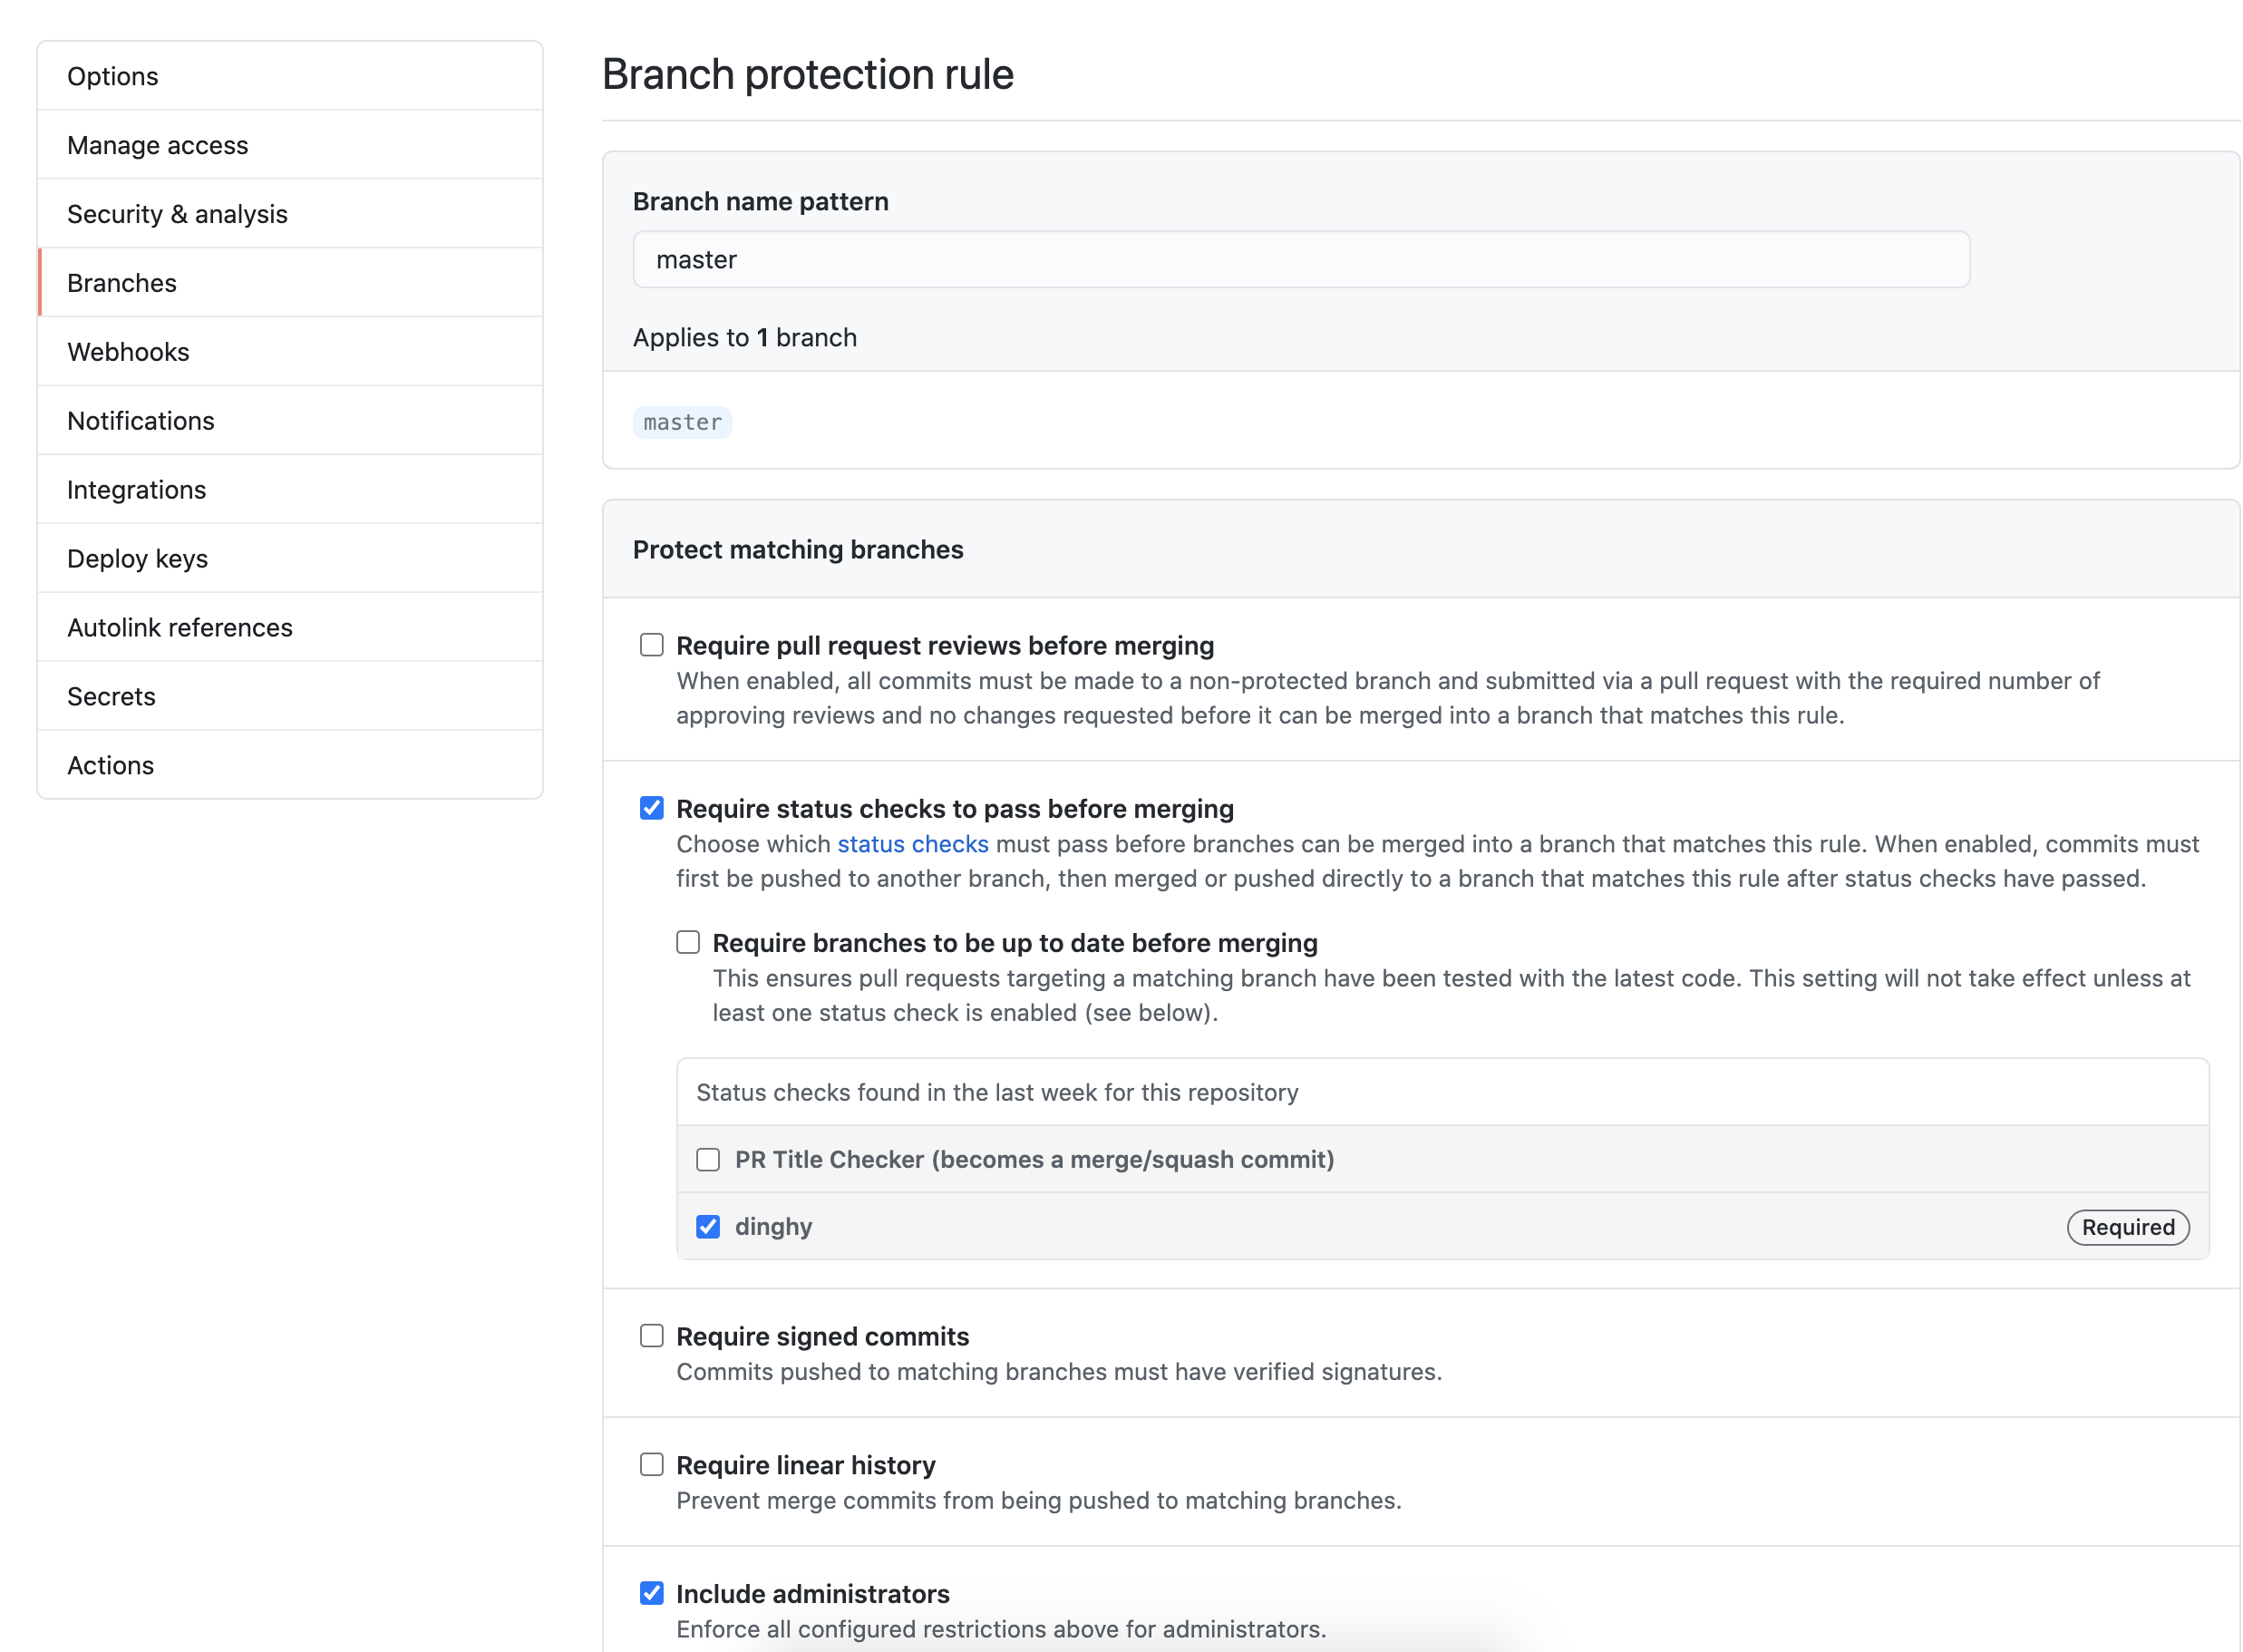
Perform the following steps to configure mandatory PR validation:
- Go to your GitHub repository.
- Click on Settings > Branches.
- In Branch protection rules, select Add rule.
- Add
masterin Branch name pattern so that the rule gets enforced on themasterbranch. Note that if this is a new repository with no commits, the “dinghy” option does not appear. You must first create adinghyfilein any branch. - Select Require status checks to pass before merging and make dinghy required. Select Include administrators as well so that all PRs get validated, regardless of user.
The following screenshot shows what your GitHub settings should resemble:

Bitbucket has both cloud and server offerings. See the Atlassian docs for more on the name change from Stash to Bitbucket Server. Consult your company’s Bitbucket support desk if you need help determining what flavor and version of Bitbucket you are using.
Add the following to your dinghy.yml config:
templateOrg: <repo-org>
templateRepo: <dinghy-templates-repo>
stashUsername: <stash_user>
stashToken: <abc>
stashEndpoint: <https://my-endpoint>
All fields are required.
templateRepo: VCS repository where module templates are locatedstashUsername: Stash usernamestashToken: Stash token. This field supports “encrypted” field references; see Secrets for details.stashEndpoint: Stash API endpoint. If you’re using Bitbucket Server, update the endpoint to include the api e.g. https://your-endpoint-here.com/rest/api/1.0
If you’re using Bitbucket Server, update the endpoint to include the api, e.g.
--stash-endpoint https://your-endpoint-here.com/rest/api/1.0
You need to set up webhooks for each project that has the dinghyfile or module separately. Make the webhook POST to: https://spinnaker.your-company.com:8084/webhooks/git/bitbucket. If you’re using Stash <v3.11.6, you need to install the webhook plugin to be able to set up webhooks.
Add the following to your dinghy.yml config:
templateOrg: <repo-org>
templateRepo: <dinghy-templates-repo>
gitlabToken: <abc>
gitlabEndpoint: <https://my-endpoint>
All fields are required.
templateOrg: VCS organization or namespace where application and template repositories are locatedtemplateRepo: VCS repository where module templates are locatedgitlabToken: GitLab token. This field supports “encrypted” field references; see Secrets for details.gitlabEndpoint: GitLab endpoint
Under Settings -> Integrations on your project page, point your webhooks to https://<your-gate-url>/webhooks/git/gitlab. Make sure the server your GitLab install is running on can connect to your Gate URL. Armory also needs to communicate with your GitLab installation. Ensure that connectivity works as well.
Deploy the service
Replace <version> with the Pipelines-as-Code service version compatible with your Spinnaker version.
apiVersion: v1
kind: Service
metadata:
  name: spin-dinghy
  labels:
    app: spin
    cluster: spin-dinghy
spec:
  selector:
    app: spin
    cluster: spin-dinghy
  type: ClusterIP
  ports:
    - protocol: TCP
      port: 8081
      targetPort: 8081
---
apiVersion: apps/v1
kind: Deployment
metadata:
  name: spin-dinghy
  annotations:
    moniker.spinnaker.io/application: '"spin"'
    moniker.spinnaker.io/cluster: '"dinghy"'
  labels:
    app: spin
    cluster: spin-dinghy
    app.kubernetes.io/name: dinghy
    app.kubernetes.io/managed-by: armory
    app.kubernetes.io/part-of: spinnaker
    app.kubernetes.io/version: <version>
spec:
  replicas: 1
  selector:
    matchLabels:
      app: spin
      cluster: spin-dinghy
  template:
    metadata:
      annotations: null
      labels:
        app: spin
        cluster: spin-dinghy
        app.kubernetes.io/name: dinghy
        app.kubernetes.io/managed-by: armory
        app.kubernetes.io/part-of: spinnaker
        app.kubernetes.io/version: <version>
    spec:
      containers:
        - name: dinghy
          image: docker.io/armory/dinghy
          ports:
            - containerPort: 8081
          startupProbe:
            httpGet:
              path: /health
              port: 8081
            failureThreshold: 3
            periodSeconds: 10
            successThreshold: 1
            timeoutSeconds: 1
          readinessProbe:
            exec:
              command:
                - wget
                - --no-check-certificate
                - --spider
                - -q
                - http://localhost:8081/health
            failureThreshold: 3
            initialDelaySeconds: 90
            periodSeconds: 10
            successThreshold: 1
            timeoutSeconds: 1
          volumeMounts:
            - name: spin-dinghy-config-file
              mountPath: /opt/spinnaker/config
      volumes:
        - name: spin-dinghy-config-file
          secret:
            secretName: spin-dinghy-config-file
Apply the ConfigMap and Deployment manifests in your spinnaker namespace.
Install the plugin
A note about installing plugins in Spinnaker
When Halyard adds a plugin to a Spinnaker installation, it adds the plugin repository information to all services, not just the ones the plugin is for. This means that when you restart Spinnaker, each service restarts, downloads the plugin, and checks if an extension exists for that service. Each service restarting is not ideal for large Spinnaker installations due to service restart times. Clouddriver can take an hour or more to restart if you have many accounts configured.
The Pipelines-as-Code plugin extends Gate and Echo. To avoid every Spinnaker service restarting and downloading the plugin, do not add the plugin using Halyard. Instead, follow the Local Config installation method, in which you configure the plugin in each extended service’s local profile.
The Pipelines-as-Code plugin extends Gate and Echo. You should create or update the extended service’s local profile in the same directory as the other Halyard configuration files. This is usually ~/.hal/default/profiles on the machine where Halyard is running.
Replace <version> with the plugin version that’s compatible with your Spinnaker instance.
Add the following to
gate-local.yml:spinnaker: extensibility: plugins: Armory.PipelinesAsCode: enabled: true version: <version> repositories: pipelinesAsCode: enabled: true url: https://raw.githubusercontent.com/armory-plugins/pluginRepository/master/repositories.jsonAdd the following to
echo-local.yml:armorywebhooks: enabled; true forwarding: baseUrl: http://spin-dinghy:8081 endpoint: v1/webhooks spinnaker: extensibility: plugins: Armory.PipelinesAsCode: enabled: true version: <version> repositories: pipelinesAsCode: enabled: true url: https://raw.githubusercontent.com/armory-plugins/pluginRepository/master/repositories.jsonarmorywebhooksconfig tells the service where to forward events it receives from the repo.Save your files and apply your changes by running
hal deploy apply.
What’s next
Feedback
Was this page helpful?
Thank you for letting us know!
Sorry to hear that. Please tell us how we can improve.
Last modified June 9, 2023: (bdb589b9)